

By: Elizabeth Sandoval
Don’t know what crafts to make for this holiday season? Well here’s a 10 ideas and steps how to make holiday crafts.
As teens we love to decorate our rooms for christmas so here’s some ideas for the holiday spirit.As teens we love to decorate our rooms for christmas so here’s some ideas for the holiday spirit.
Snowflake room decorations- 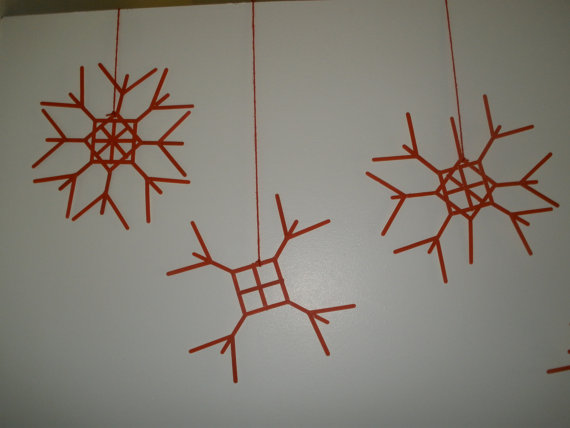 These are meant to be hung and go on your wall.
Steps:
- Get Popsicle sticks and form them into a snowflake.
- Glue the sticks together and paint them red or any color you’d like
Melted Crayon Ornaments- 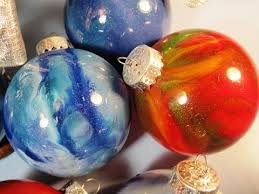 You will need clear ornaments, crayons, and a hairdryer
Steps:
- Take the cap off the the ornaments and drop cut up crayons and any color of your choice.
- Put the ornament top back on and hold the top and put the hairdryer on the ornament to get the crayons melted.
- Spin the ornament to get the crayon all around the inside.
Popsicle stick sleds-  You will need Popsicle sticks (2 regular sized and 5 small sticks for each sled), wood glue, wood stain, paint, twine, glue dots, and jingle bells.
Steps:
- Use a toothpick to apply glue and glue 4 small sticks together with the end sticks a little bit lower.
- Paint the small sticks any color you’d like and let dry.
- Using a rag stain the regular sized sticks.
- Then glue on the stained sled runners to the smaller sticks.
- Using a small Popsicle stick glue it to the front of the sled.
- Glue some bells onto the front of the sled.
Popsicle stick Santa- 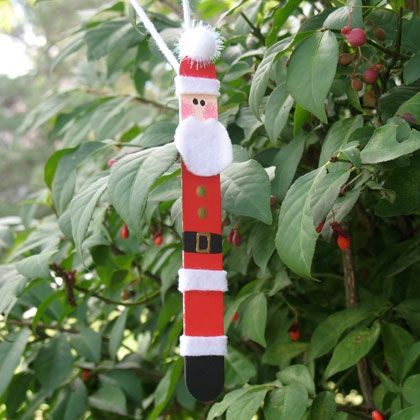 Get one Popsicle stick, small pom poms, googly eyes, pipe cleaners, paint and paint brushes, q tips, and Elmer’s liquid glue, foam paper.
Steps:
- Paint your Popsicle sticks and let them dry for 30 minutes.
- Once dry cut out a small Santa hat and glue it to the top of the Popsicle stick.
- Then cut out a small black strip for a belt.
- Then get a cotton ball and cut it to fit the face for the Popsicle stick for Santa’s beard.
- Then cut out a small circle for the nose and glue on the eyes and nose.
Snowman made out of popsicle sticks- 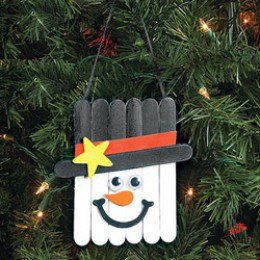 You will need seven popsicle sticks, white paint, wood glue, black paint, googly eyes, and a piece of red fabric.
Steps:
- Using wood, glue 6 pieces of Popsicle sticks together facing up and down and then glue the last stick sideways on the other sticks.
- Then let the glue dry then paint the bottom part of the sticks white and the top part and include the stick glued on black.
- Once all dry glue the googly eyes on the white part and paint the nose using the orange paint carrot shaped and add a mouth with the black paint.
- Then glue the red fabric on the black part of the hat.