

By: Jesus Cruz Valdez
OwlFeed Journalist
Welcome to the second part of this guide covering The Legend of Zelda: Breath of the Wild. This part will be going into some of the villages, nations and overall storyline.
If you haven’t read Part 1, click here.
From you waking up and gliding off the Great Plateau. You head towards the story marker on your map which then lands you in Kakariko Village.
Kakariko Village
In this village, you meet with Impa and she tells you about the prophecy. She tells you to retrieve the Divine Beasts and to destroy Ganon. She also tells you to seek out Purah in Hateno Village.
In this village, you can buy certain monster parts and ingredients for food. You can also buy Fortified Pumpkins at a certain patch near the back of the village. There are also side quests in this village that are optional but are still pretty easy.
The first side quest you may find is Cooking with Koko, she wants you to bring her goat butter. That is easily found in the shop to the left of the main entrance, assuming you have the rupees for it you can buy it by going up to the item.
Keep in mind that the shopkeepers and merchants can go out of stock if you buy too much. Kakariko Village is a peaceful village and fun. I rate the village a good 8.5/10!
Hateno Village
This fairly peaceful village is west of Kakariko. North of the village you find Purah in her lab and once you bring the blue flame from the lantern in Hateno Village to her lab she fixes your Sheikah Slate.
Your Sheikah Slate now has the ability to take pictures and there are already pictures logged there. If you go to the locations where the pictures are, you recall a memory, which gives you more plot and context to the storyline.
Finish that main mission first, if you want to feel sympathy for the Champions and get a different ending cutscene. I rate that village a 5/10 because it feels like a passing village. The only reason I feel it’s important is because of the Laboratory and the building to change your outfit colors.
Zora’s Domain- Vah Ruta
This is one of the areas of the map that is affected by one of the Divine Beasts. In this area, before you free the Divine Beast from Ganon’s grasp, it is always raining.
Before you even enter the domain, you encounter Prince Sidon and he is searching for a Hylian. They want the Hylian to help subdue Vah Ruta, which is the name of the Divine Beast.
The reason for this is because the only way to stop Vah Ruta is to use shock arrows and the people in Zora’s Domain are basically fish people.
You yourself don’t get shock arrows until you enter other domains or encounter other people. There is one way to get shock arrows and that’s from a beast atop a nearby mountain called a Lynel.
These Lynels are rather difficult even if you have armor and a ton of hearts. A fellow gamer Sydnee Messerschmidt said, “It’s even more difficult than Ganon.” She’s referring to the final boss of the game. You have to be almost perfect with the mechanics against these Lynels.
You don’t necessarily have to kill the beast, all you have to do is sneak around and pick up 20 shocks arrows. Once you do, you head towards Vah Ruta where you’ll see Sidon waiting. Sidon’s plan is to have you ride him into battle against Vah Ruta and shoot at the red orbs atop of the beast.
For your first playthrough, don’t underestimate Vah Ruta. It throws blocks of ice at you and you have to knock the ice aside or destroy them until Sidon thinks it’s safe to attack it. You wash, rinse, repeat until it you shocked all the orbs atop of Vah Ruta.
Once you do, it allows you to enter it. Upon entering it you have to activate the terminals inside of it to free Vah Ruta. Once all are activated you must activate the main terminal which triggers a boss battle.
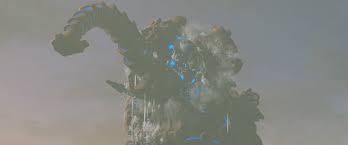
This boss is called Waterblight Ganon. This boss’ main weapon is a spear and it can throw it or slash with it. It isn’t too difficult and the only difficulty added is when it fills the place up with water.
Once you defeat it, Mipha talks to you and gives you her power which is Mipha’s Grace. Upon death, it’ll fully revive you and give you five temporary hearts.
Mipha’s Grace is an incredibly powerful asset that’s added to your arsenal. Though it does go on cooldown after one use, it’s still helpful.
This place is absolutely beautiful, everything about it, but I rate the region an 8/10. Zora’s Domain was made on water, so don’t fall off if you don’t have enough stamina or the proper gear. Swimming and I, we have a love-hate relationship, so I’m docking two points off.
Gerudo Town-Vah Naboris
The journey into Gerudo Town is scary if you haven’t made elixirs for heat resistance or enough food in general. Just for clarification, it’s in the middle of a desert. While heading towards Gerudo Town you encounter multiple Lizalfos hiding in the sand.
If you’re heading in without any heat resistance, make sure to pack food, the heat of the desert hurts you every so often. If you see shade, stick to it. If you find water, you can sit in it to cool down, but it doesn’t really help you long term.
Before making it to Gerudo Town, you make it to a rest stop called Kara Kara Bazaar. Here you can buy hydromelons and cook them into a chilly elixir to help with your heat resistance.
Head towards Gerudo Town and by the Shrine talk to the man looking at the front entrance. He will tell you about the man sneaking in and out of Gerudo Town by using women’s clothing.
Go back to Kara Kara Bazaar and on top of the giant rock is the man that’s sneaking in and out of Gerudo Town. He’ll sell you the full set for 600 rupees and you’ll be set to head into Gerudo Town.
The only reason you need women’s clothing to enter Gerudo Town is based on the Gerudo’s tradition. If you want more information on the different types of people, check the section Gerudo in part one.
When you enter the Chief’s throne room, Chief Riju will assign you the quest to take back the prized Thunder Helm from the Yiga Clan. The Yiga Clan’s Hideout will be close to the Northern Icehouse, but a bit farther south you’ll find an opening in between two mountains.
All you have to do is follow the path and if you encounter a few Yiga Clan Bowmasters, you know you’re on the right track. If not, look for Karusa Valley on the map and follow that.
Inside the Hideout, move stealthily or you’ll face people from the Yiga Clan and they’re horrifically strong.
Once you move through everything, you face Master Kogha. He is fairly easy if you know how to use the mechanics of the Sheikah Slate. Once beaten, he’ll fall into a pit nearby and a chest appears which has the Thunder Helm inside.
Head back to Gerudo Town to give the Thunder Helm back to Lady Riju. She then trusts you enough to take down Vah Naboris. She gives you bomb arrows and tells you to target the glowing parts of the feet, but you have to stay around her, inside of a protective circle.
Once Vah Naboris is taken down it’s essentially the same concept as Vah Ruta but the boss is easily the most difficult of the Blight Ganons. Its name is Thunderblight Ganon and it’s very quick.
Its main weapons are a sword and shield but as you go on it uses electricity. Once struck by its weapon, you take an immense amount of damage and you drop your metal weapons. At one point it drops metal rods and it uses lightning to conduct through the rods to damage you.
Once you kill it you spark a cutscene and Urbosa talks to you. She gives you Urbosa’s Fury which gives you the ability to obliterate basic enemies.
You talk to Lady Riju, once done, every guard considers you a Gerudo. But keep on your women’s clothing still or you’ll get thrown out.
This place is a pain to get to and move around in. I love the enemies and side quests you can do in the Town essentially landing you access the Thunder Helm. I rate this place a good 8.5/10.

Rito Village-Vah Medoh
If you head towards the Northwest region of the map it’s very cold and it’s home of Rito Village. The Rito love flying high but Vah Medoh is restricting them. They would get shot down by its cannons.
Talk to Kaneli and he’ll tell you about the Divine Beast and how Teba is trying to take the Beast down by himself. Talk to Saki, Teba’s wife, and from there she tells you to go to the Flight Range and points you in the direction.
Once at the Flight Range, you meet with Teba and he tells you that he doesn’t trust you quite yet. He makes you shoot at targets at the Flight Range 5 targets and then he trusts you.
He gives you bomb arrows to destroy the cannons on Vah Medoh so it’d let down its protective shield. Once you destroy all the cannons, you land on Vah Medoh and Teba leaves because he got injured by one of the cannons.
This Divine Beast is like all the others. Activate all the control terminals and the main terminal activates. Once you activate the main control a boss fight triggers, the boss is called Windblight Ganon.
Windblight Ganon’s main weapon is a laser and it can create tornadoes. As always, shoot it in the eye. It may be difficult to hit the eye, so use the wind drafts nearby.
Once Winderblight Ganon is killed, it triggers a cutscene where Revali gives you Revali’s Gale. Revali’s Gale allows you to launch in the air and glide three times. It’s also on a cooldown. I rate the region an 8.5/10 because it’s very peaceful but it’s cold so one point and a half is docked off.
Goron City-Vah Rudania
This city is near a volcano so you’d need to buy a few fireproof elixirs at the Foothill Stable. You’d have to keep buying them until you’re able to buy the Fireproof Armor set in Goron City.
First of all, you have to find Daruk’s ancestor Yunobo who is trapped underneath rocks. You have to use cannons to destroy the rocks and rescue this Goron. This Goron goes on to help you subdue Vah Rudania long enough for you to board it.
How he does it, you may ask? He gets into the cannons and gets shot at Vah Rudania via bombs and aiming the cannon. You have to hit the Divine Beast three times, but it isn’t that simple. There are flying Guardians on this mountain. If you end up getting spotted by one of them Vah Rudania makes molten rocks fall from the sky.
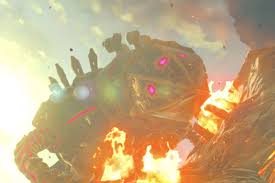
Once you subdue it, it’s the same idea as the others: activate the terminals so the main control terminal activates. Once you activate the main control terminal, it triggers a boss fight against Fireblight Ganon.
Its main weapon is a sword and some fireballs. To kill it, you have to be good with a bow and shoot its eye. In the second phase, it has a protective shield and its sword has a flame ability. It starts to suck everything up so just use a bomb and detonate at the right time to stun it.
Once you defeat that boss, you trigger a cutscene with Daruk and attain Daruk’s Protection. This can protect you up to three times and is put on cooldown once all are used. It’s a very useful tool against Ganon.
My review on this is a 7/10 considering you can’t use wood weapons or they’d burn. So some bows, weapons, normal clothes and shields are out of the question.
Destroy Ganon
This can be done at any point in the game if I’m completely honest. I’d advise against it though because it’s really difficult to kill Ganon completely with certain equipment. I’d also advise against it because these memories and the storyline that goes along with it is really rewarding, at least to me.
To actually defeat Ganon you’d need to know how to parry and perfect dodge properly. If you’re no good at these mechanics, perfect them. First, start off parrying Bokoblin attacks and perfect dodging them. Then, go on to dodging and parrying attacks from Moblins, stationary Guardians and then Lynels.
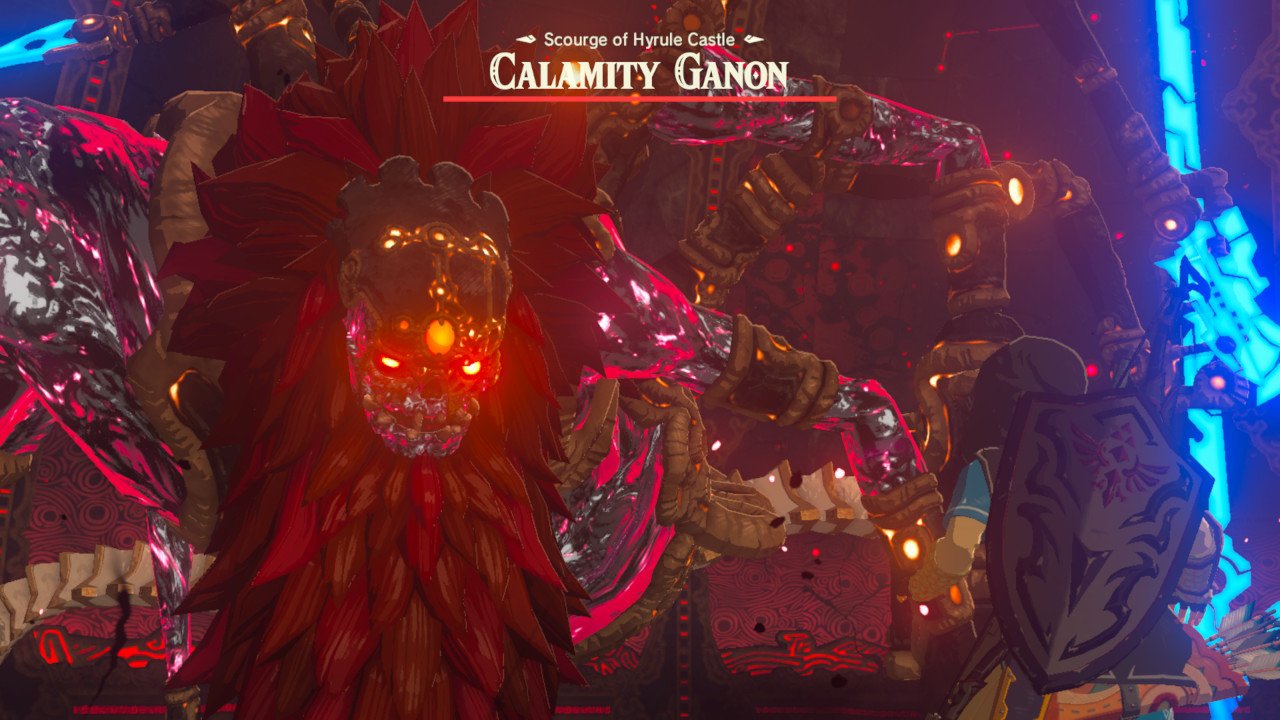
Once you actually get into the hall where Ganon is, if you attained all the Divine Beasts powers, they attack it all at once and bring it down to half health. Once you fend off a flurry of attacks and kill Ganon, he goes to the fields above and starts to attack recklessly in his strongest form which can only be injured by the Bow of Light or Ancient Arrows.
The Aftermath
Princess Zelda helps you by weakening certain points and she tells you to attack them to weaken Ganon. Once Ganon is weakened enough, he opens his eye which is his core. Attack that once to destroy Ganon and trigger a cutscene, where Zelda asks Link, “Do you really remember me?”
The only way to trigger the “secret ending” where Zelda talks about checking up on the Divine Beasts with Link is to finish Captured Memories and find the final secret memory. The ending is a 10/10, though it left some questions unanswered, the sequel is coming out!
This has been fun and it’s also the second and final part of this guide. I hope you enjoyed! I highly recommend this game, if you get the chance to play this game, please do so.